Centralized campaign creation and edit
Campaign is a feature that enables all the promotions offered by the gym at discounted rate (with a specific timeline with a start and end date) to be configured on the software. The configuration of one campaign can be assigned to multiple centres with different discounted rates as per the centre location.
Offers like New Year Offer, Independence Day Offer, Valentines Day Offer, Women’s Day Offer, Student Offer. e.g.12 Months Membership is sold for Rs. 20,000/- as a base cost (regular price) and the promotional offer “New Year Offer 2021” will be sold at Rs. 16,000/- and valid between 31st December 2020 till 2nd January 2021.
Process to Configure the New Campaign:

After logging in to the software, right before selecting the centre, there will be multiple tabs above as shown in the image.
Go to Campaign and click on Campaign Filter, it will redirect to the New Campaign Config and Existing Campaign Editing page.

The above image shows the add new campaign and existing campaign list page.
How to configure new campaign:
On this page you will find the list of all the campaigns created earlier. Every campaign will show the information about the ‘Status’, ‘Run across’, ‘Who can execute’ and ‘Last updated date’.
Status: It shows whether the campaign is Active or Inactive.
Runs Across: This icon shows how many centers can sell this campaign. e.g. if you have 5 branches in total and you sell specific campaigns only in 3 centres. You can then see the centre count as #3. Let's assume that there are two brands of the same Gym i.e. XYZ Pro Club and XYZ Premium Club, the XYZ Pro brand has 3 gym centres and the remaining 2 centres belong to the XYZ Premium brand. In this case the ‘Run Across’ will show ‘3 centres, 1 Brand’.
Who can execute: When you see both the icons i.e Web and Mobile App under ‘who can execute’ column. It indicates that this campaign is available to be sold at the centre i.e. the invoicing will be done using the web application at the centre as well as it can be sold through the Mobile App. So your clients can directly purchase it from the Mobile App as well.
If you configure the campaign to be sold only on the Mobile App and not on the web app, then here you will see the active icon of the Mobile App only. This means your clients can buy the specific campaign from the Mobile App only and cannot buy them at the centre.
Last Update Date: It shows the last date when the campaign was edited or updated. Please Note: It doesn't track the record of the changes made to the campaign.
You can also use the Campaign Name filter to search the campaign from the list of campaigns created.
The explanation and steps on editing of the existing campaign has been mentioned after the completion of New Campaign Creation.
To create the new campaigns. Click on the Add New Campaign button. It will redirect you to the below mentioned configuration page. In this configuration page you need to follow below 4 Steps:
- Step1 - Campaign Information: Here you need to fill the Campaign information.
- Step2 - Campaign Execution: Here you can define where this campaign can be sold i.e at the centre or through mobile application or client portal etc. Also you can set user permissions who can sell the campaigns at the centre. You can also set criterias based on the campaign requirements like Referred by, age, gender, document required.
- Step3 - Add Product / Package / Stock: Here you need to add multiple products, package and stock and set the relevant setting to create the campaign.
- Step4 - Assign the centres: Here you need to define the centres where you would like to sell the campaigns.

The above image shows the Step 1.1 of campaign creation.
Step 1: Campaign Information: You will need to fill in the details as all are mandatory fields except the Terms & Conditions.
Details mentioned below:
Campaign Name (Default)*: Enter the name of the campaign as shown in the image example “ Independence Day 2020 “. This name will be displayed at the time of invoice creation and will be displayed on the invoice print for the client to have.
Description (Default): This can be a short description of the campaign that you want to have about it in the FitnessForce software. This will not be displayed on the invoice creation page or on the invoice print page. In case of NO description required, then you can just copy paste the Campaign Name in this field. This field is Mandatory to be filled. e.g. Campaign Name: New Year 2021 Offer
Description: Gym Membership 12 Months + PT 12 Months 144 Sessions
Terms & Conditions (Default): This will allow you to have a separate Terms & Conditions pertaining to the Campaign you intend to use. This will be displayed on the invoice print page. e.g.
- The amount paid for the Campaign will not be adjusted as it is already at a discounted rate.
- Cannot be refunded once payment has been made.
- Note: In case there are NO separate Terms & Conditions for the Campaign, then you can keep the Terms and Conditions field blank. Then by default Terms & Conditions will be applied at the time of invoicing which is added at the centre level.
Similarly like the web application, you can configure the same fields for the Mobile App in case if you’ve opted for the Mobile Application services of FitnessForce.
Campaign Name (English): Also known as Friendly Name. Enter the name of the campaign as shown in the image example “ Independence Day 2020 “. This name will be reflected in the Mobile App buy page for your members to buy online through Mobile App or Website. This field is compulsory whether you are using the FitnessForce Mobile or not.
Description (English): Similar to the Default description, you have to enter the description in this field. In case of NO description required, then you can just copy paste the Campaign Name in this field. This field is Mandatory to be filled.
Terms & Conditions (English): Similar to the Default Terms & Conditions.
Similarly, there will be fields of Name, Description and Terms & Conditions in Arabic in case Middle East Clients want to show the Campaign names on the mobile app in Arabic.

The above image shows the remaining part of Step 1.2 of campaign creation, i.e. Campaign’s Additional Information and Advance Settings.

Under Campaign’s Additional Information:
As shown in the above image, the fields for the “Additional Information” to be filled. All fields are mandatory except for the Campaign Image and Campaign Logo. As you can see in the image there are asterisk (*) signs right besides the names of the fields.
Details mentioned below:
Campaign Short Name*: Enter the short name of the campaign as shown in the image example for “ Independence Day 2020 “ as “ ID20 “. The short name should be of 4 Characters. It can either be all alphabets or alphanumeric.
Campaign Image: You can have the campaign image uploaded which will be visible at the time of invoicing. This is not a compulsory field.
Campaign Logo: You can have the campaign logo uploaded which will be visible at the time of invoicing. This is not a compulsory field.
Status*: The status has to be ACTIVE so that at the time of invoicing, this campaign will be available for the staff to bill the client. In case the status has been selected as INACTIVE then the campaign will not be visible at the time of invoicing.
Campaign Start Date*: Set the Start date of the campaign according to your club/gym offer requirements. As shown in the image.
Campaign End Date*: Set the End date of the campaign according to your club/gym offer requirements. As shown in the image.

Under Advance Settings:
As shown in the image, under the “Advance Settings”, these fields are based on the centre requirements.
Details mentioned below:
Show on Upgrade: This will allow you to have the campaign appear at the time of upgrading a members membership.
e.g. A member X has an active membership of 1 Month and the client wants to upgrade to the 12 Months membership which is being sold under the offer. Hence, for the existing active members to avail the offer by upgrading their membership, the radio button should be on YES. If the offer is not for the existing members then the radio button should be on NO
Decremental: If the campaign runs any offer where the member gets a benefit of receiving free membership days, then the number of free days’ calculation will be done using the Decremental logic. As per the Decremental logic, the max free Days for the products in the campaign is set in the campaign configuration (e.g. 30 days). Once the campaign start date is reached (e.g. 15th of May), the free day’s reduction begins. This calculation keeps reducing one day each (starting with the day after the start day of the campaign [e.g. 16th of May)] from the max free days configured for the campaign.
Any campaigns where free days are offered on the membership.
e.g. A member is purchasing a 3 Months Membership and under the decremental campaign setting 30 days are given for free. Let’s assume the activation date of the membership is 09-May-2020 and as per 3 months membership its expiry date should be 09-Aug-2020 i.e. 91 days. Adding 30 free days to this makes the total days as 91+30 = 121 days and hence expiry date as 09-Sep-2020.
Note: When the Decremental checkbox is unticked, the campaign will work based on the offers configured in step 3 for each product.
Min. amount to be paid for campaign: This setting is to set the minimum amount for the invoicing purposes so that the invoice should be created with at least an amount and not keeping the full amount in balance. e.g. 12 Months membership is for Rs. 16,000/- and the percentage set for the minimum amount is let’s say 20%. Then the client has to pay at least an initial amount of upto 20% percentage of the total Rs. 16,000/-.
Exclude from best price match: This setting is to have both the base cost (regular price) as well as the offered price visible at the time of invoicing. Note: If the check-box is left unchecked, then the lowest price of the membership, be it in any of the campaigns or products, only the lowest price will be reflected at the time of invoicing. So make sure that the checkbox has been checked before completing the campaign configuration/creation.

The above image shows Step 2A and Step 2B of campaign creation.
Step 2: Campaign Execution: As shown in the above image, there are 2 parts in Step 2 i.e.
Step 2A - Offer Execution & Required Documents (Optional)
Step 2B - Advance Criteria (Optional)
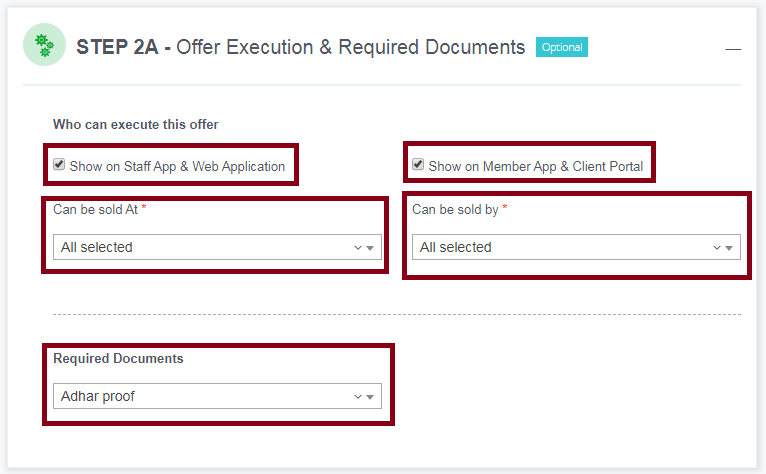
Step 2A - Offer Execution & Required Documents (Optional): These fields are optional to be selected.
Selling Channel: This setting is whether the campaign should be visible in the Buy page of Mobile app and/ Website.
Can be sold by: This setting will allow you to restrict the selling of the campaign at a particular centre or by a staff.
Sold At: This is a setting for a campaign to be sold at a centre.
Sold By: This is a setting for a campaign to be sold by which staff. For example: there is an offer for VIP members and those are exclusively sold by the Management only, then by this setting you can only select those names who can view and add this campaign at the time of invoicing.
Note:
The Sold By option if not selected, by default All names are selected of the users who can create an invoice.
Required Documents: This setting is to have a document attached in case there is a requirement for the same. For example: Student Offer, the students are required to provide their Active College ID card to avail the student offer.

Step 2B - Advance Criteria (Optional): This field(s) is to set criteria for your campaign as per the requirement of the club/gym offer. For example criterias like:
Age: This can be set for Student Offer (age: 15 to 21), Senior Citizen Offer (age: 55 to 100) or Kids Offer (age: 5 to 14).
Gender: This can be set for Women’s Day Offer.
Referred By: This is a very much utilized setting. Every gym/club has their own referral offers that they provide. So how can a member who has referred other members can get benefits of this offer, is to have the campaign configured and set the criteria of REFERRED BY setting.
There are 3 radio buttons:
None: This is by default selected in case you do not want any Referred by criteria to be set.
Should be Referred by someone: This setting is for those members who have been referred by someone. e.g. Sunil is an existing member and has referred to Dasharath who is a new member to the club/gym. By this setting the new member Dasharath will be able to avail the offer provided in the Referral Campaign.
Should have referred more or equal to: This setting is for those members who have referred members/enquiries. e.g. Sunil is an existing member and has referred to Dasharath who is a new member to the club/gym. By this setting the existing member Sunil will be able to avail the offer provided in the Referral Campaign.

The above image shows the Step 3 of campaign creation.
Step3 - Add Product / Package / Stock: As shown in the above image, this is where you select the Product / Package / Stock to be added in the campaign which is to be sold at a discounted price.
To add the product / package / stock in the campaign, you can click on the Add sign (+) shown on the left side of the names of product / package / stock.
There are search dropdowns to simplify the selection option.
List as mentioned below:
Type: The dropdown will provide you the list of types as Product / Package / stock for you to search that needs to be added in the campaign. e.g. If you select the Type as Product, then only the list of products will be visible for you to select and add in the campaign. Similarly, if you select the Type as Package, then only the list of packages will be visible for you to select and add in the campaign.
Product Type: The dropdown will provide you a list of services that are available in the packages or just the products. e.g. Packages consist of Membership + Personal Training, example naming “ 12 Months Gym Membership + 12 Months PT “ and there are products under the types of Memberships and Personal Training, example naming “12 Months Membership” and “PT 12M 144S”.
In case if you select the Type as Membership, then the list below will show all the packages and products consisting of the type Membership. Similarly with the type of Personal Training, this will provide you the list of packages and products having the PT as a type.
Same goes for Stock, in case the type is selected as supplements, then the list of stocks with the type of supplement will be listed below for your selection to add in the campaign.
Search: This field will allow you to search the product / package / stock by their names.
Once you have your desired selection and clicked on the Add sign (+) to add the Product / Package / Stock in the campaign, then you have to go to the next step i.e. Step 4- Assigning the centre on which the desired selection should be visible in at the time of invoicing.


The above image shows the Step 4.1 Assign Centre of campaign creation - Package Page.
Step4 - Assign the centres: As shown in the above image, in a campaign if a/the Package has been selected to be sold at a discounted rate along with Product and Stock, then the package will appear first to make the changes in the rate and other settings.
There is a REMOVE option too in case you have added the wrong Package in the campaign.
Under the Package field, it will show the list of products in the package. You can do the changes either to the complete package or individual product in the package. e.g. Package Name: Gym Membership - 12 Months + Zumba - 3 Months. Once the package(s) is added as shown in the above image, you need to fill the relevant settings as below:
Edit Button: In order to edit the below-mentioned fields, you need to click on the Edit button as shown in the image above.
Transferable: In this setting, select Yes or No to the individual products added to this package.e.g. Transferable option ‘Yes’ selected for ‘Gym Membership - 12 Months’ and ‘No’ selected for ‘Zumba - 3 Months’. Now, let's say the member for some reason discontinues to attend the gym and wishes to transfer this package to another member or to a non-member, then from this package only the remaining membership period of his ‘12 months Gym membership’ will be transferred to another person because the ‘Transferable’ option was set to ‘Yes’, however ‘Zumba 3 Months’, will not be transferred as the setting was set to ‘No’. Similarly, if the ‘Transferable’ setting is set to ‘No’ for both the products under this package then the member will not be allowed to transfer his package to another person.
Freeze Allowed: If you want to allow ‘Membership Freeze’ then select ‘Yes’ if you don't want to allow the membership freezing then select as ‘No’.
Freeze Type: There are two freeze types i) Prepaid and ii) Postpaid.
i. Prepaid: This option can be used, if you want to sell the package inclusive of the freezing charges. Clients do not have to pay for any additional charges at the time of doing the membership freeze because these charges are already included at the time of buying the membership i.e Advance Freeze Fee charges.
However the freeze will be allowed as per the ‘Freeze Attempts’. This also means every time before applying for the Freeze of membership no invoices have to be generated.
If you want to allow one time ‘Freeze’ for free then select the Type as ‘Prepaid’ and Freeze attempt as “1” for that particular product. Fee will remain “0”. No invoices will be generated either.
ii. Postpaid: In the Postpaid Freeze,a member is not eligible for a ‘Free Freeze’, thus an invoice has to be created as per the Freeze Fee charges before every freeze transaction is applied. e.g. Let’s say, for Gym 12 Months Membership, Freeze attempts allowed is #3 and the freezing fee is INR 300. This means INR 300 is the Freeze fee per attempt. So for 2 attempts it will be INR 600 & so on. Post the Invoice is generated the Membership can be frozen as per the allowed freeze days.
Attempt Allowed: This helps define the number of attempts allowed to Freeze a membership as per valid days of the membership. e.g. Gym Membership - 12 Months, freeze attempt allowed as #3. Gym Membership - 06 Months, freeze attempt allowed as #1.
Max freeze Days: You can define the maximum freeze days allowed per freeze attempt. e.g. 20 days set as Max days per Freeze attempt. This means, the client will not be able to freeze the membership more than 20days per freeze attempt.
Freeze Fee: This setting is applicable to the Postpaid Freeze option. You can define the freezing fee as per the individual product. e.g. Let’s say, freezing fee is defined as INR 200 for 6 Months Gym Membership. Fee of INR 300 for 12 Months Gym Membership etc. Prepaid Freeze will not have Freezing Fee.
Stock 1, Stock 2, Stock 3: Along with the package if stocks have to be assigned then you can select the ‘Stock’ names from the drop down.
e.g. With Gym Membership 12 Months + Zumba 3 Months. Gym Bag & Sipper Bottle is free then here you can select the gym bag in ‘Stock1’ and Sipper bottle in ‘Stock2 field’.
Refer to Stock Current Report to learn more
Brand & Centre: Here you have to select the brand and add the centres accordingly in the campaign so that the package(s) will be visible at the time of invoicing on those particular centres which the package is assigned to.
To add the centre, click on the Add sign (+) on the left side of the center name. This will enable the campaign in the selected center.

After selecting the center name. You can also apply a discount on the added products in this package. You can refer to the Discount Percentage field and click on the hyperlink ‘Apply to all’ as shown in the ‘Brand & Center: Default Categories’ image.

Similarly, you can apply a discount on Net Cost by clicking on the hyperlink Apply to all
After applying the ‘Discount Percentage’ and ‘Net Cost’. You’ll have two options :
I. Apply to this brand - Selecting this option will apply the discount for the selected center only.
II. Apply to all brands - Selecting this option will apply the discount for all the centers of that Brand. e.g. If XYZ - Premium brand has 6 centres then it will be applied on all the 6 centres.
To apply the discount or net cost you can then click on Submit button


The above image shows the Step 4.2 Assign Centre of campaign creation - Product Page.
As shown in the above image, this is the page to add the product(s) to be sold at a discounted rate under the campaign.
There is a REMOVE option too in case you have added the wrong Product in the campaign.
Similar to the products in the package as shown in the steps above, the individual products rates and other required details can be edited for the campaign.


The above image shows Step 4.2 of campaign creation.
As shown in the above image, this is the page to add the stock(s) to be sold at a discounted rate under the campaign.
There is a REMOVE option too in case you have added the wrong Stock in the campaign.
Similar to the products as shown in the steps above, the individual Stock rates and other required details can be edited for the campaign.

The above image shows Step 4.3 of campaign creation.
Once all the product / package / stock has been added and the discount is applied, you can click on the Create & New button and the campaign is then created.

The above image shows the Invoice page where the campaign would be visible.
The above image shows the invoicing page where the Campaign will be visible.
Process to Edit the Existing Campaign
After logging in to the software, right before selecting the centre, there will be multiple tabs above as shown in the image above.
Go to Campaign and click on Campaign Filter, it will redirect to the New Campaign Config and Existing Campaign Editing page.

On this page you will find the list of all the campaigns created earlier. Every campaign will show the information about the ‘Status’, ‘Run across’, ‘Who can execute’ and ‘Last updated date’.
Status: It shows whether the campaign is Active, Inactive, Expired or On-Hold.
The color difference between the statuses have been defined. Like for Active, the color is Green, for Inactive the color is Blue, for Expired the color is Red and for On-Hold the color is Grey.

Active: This shows the campaign which is available for sale in those centres selected in the campaign.

Inactive: This shows the campaign which is inactive however, the End Date is still a future date.
e.g. Today is 11-May-2020 and the Start Date of the campaign is 18-May-2020 hence the status as Inactive.

Expired: This shows the campaign has expired.

On-Hold: This shows the campaign which was available for sale and later made the status as Inactive while the date is of a future date.
e.g. Today is 11-May-2020 and the End Date of the campaign is 31-May-2020 with the status as Inactive.
Runs Across: This icon shows how many centers can sell this campaign. e.g. if you have 5 branches in total and you sell specific campaigns only in 3 centres then you can see the centre count here as #3. Let's assume that there are two brands of the same Gym i.e XYZ Pro Club and XYZ Premium Club, the XYZ Pro brand has 3 gym centres and remaining 2 centres belongs to XYZ Premium brand. In this case the ‘Run Across’ will show ‘3 centres, 1 Brand’.
Who can execute: When you see both the icons i.e Web and Mobile App under ‘who can execute’ column. It indicates that this campaign is available to be sold at the centre i.e the invoicing will be done using the web application at the centre as well as it can be sold through the Mobile App. So your clients can directly purchase it from the Mobile App as well.
If you configure the campaign to be sold only on the Mobile App and not on the web app, then here you will see the active icon of the Mobile App only. This means your clients can buy the specific campaign from the Mobile App only and cannot buy them at the centre.
Last Update Date: It shows the last date when the campaign was edited or updated. Please Note: It doesn't track the record of the changes made to the campaign.
You can also use the Campaign Name filter to search the campaign from the list of campaigns created.
You can search the campaign through Status or Search by Offer name and select the desired campaign that you chose to edit.
You can edit anything in the campaign except the Short Name.
Related Articles
Product Creation and Editing - Non-Centralized
In the FitnessForce software a ‘Product’ is referred to the services offered in the Gym/Club/Studio like Membership, Personal Training, Yoga, Zumba and Mixed Martial Arts. A Product is a single service i.e. single membership and each product which is ...Product creation and edit
In the FitnessForce software a ‘Product’ is referred to the services offered in the Gym like membership, personal training, yoga, zumba, mixed martial arts. A Product is a single service i.e single membership and each product which is to be defined ...Package creation and edit
The package is a combination of two or more products. You can combine the services at discounted rates as a package offering. A single service/product purchased separately by the client would cost them more amount and such leverage can be considered ...Trial creation
Trial option is used to record the free trial sessions for the clients who need to try out the gym first before they decide to sign up for any membership. It could be a 1-day free trial or 3 days of free trial depending on the business offering to ...Member creation
This document will enable you to understand how to create members along with the membership bill in the software. The client can opt for short term or long term memberships like 3 months, 6 months, or 12 months. An invoice can be generated through ...